- Building a DIY Arduino Clone (1): Introduction
- Building a DIY Arduino Clone (2): Choosing Parts
- Building a DIY Arduino Clone (3): Burning the Bootloader
- Building a DIY Arduino Clone (4): Assembly to Completion
Using the parts from last time, let's start building the Arduino clone.
Before diving into assembly, there's an important first step — in most cases the chip won't work right out of the box.
To upload sketches from the Arduino IDE, the ATmega328P needs to have a bootloader already flashed onto it.
This post explains how to do that.
Check on Amazon Switch Science sells ATmega328P chips with the internal-clock bootloader pre-loaded.
If you use one of those, you can skip this step entirely.
If you bought a bare ATmega328P from Amazon or elsewhere, or if you want to use external-clock operation with a Switch Science chip, you'll need to flash the bootloader yourself.
(There is a way to upload sketches without a bootloader at all, but that's a story for another time.)
To flash a bootloader, you need a programmer. Conveniently, you can turn an Arduino itself into one.
The bootstrapping problem: you can't build a programmer-Arduino without a programmer — so the very first time, you need to get hold of a pre-loaded Arduino.
Since most people building a DIY Arduino already own at least one, let's use an Arduino UNO.
Once you've built your first clone, you can use it as the programmer for the second one, and the UNO is free for other projects from that point on.
Flashing the Internal-Clock Bootloader
- Download Breadboard1-5-x.zip from the Minimal Circuit page on the official Arduino site.
If you're using Arduino IDE 1.0.x, the file should be Breadboard1-0-x.zip. - Create a folder called "hardware" inside your Arduino documents folder (My Documents/Arduino).
- Extract the downloaded ZIP and drop the resulting "breadboard" folder into the "hardware" folder.
- Connect the Arduino UNO to your PC via USB and launch the Arduino IDE.
- Open the ArduinoISP example sketch and upload it to the UNO.
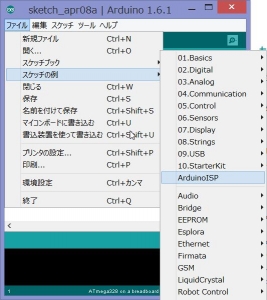
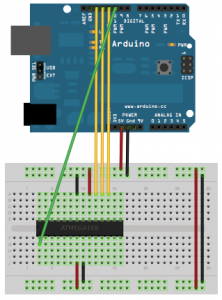
- Disconnect the USB cable, then wire up the Arduino UNO and breadboard as shown below.
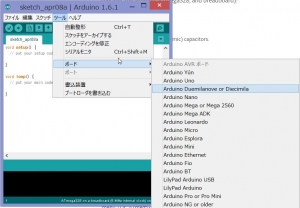
- Reconnect the USB cable and select the options as shown in the screenshot.
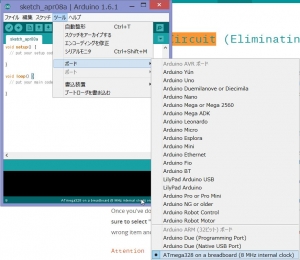
- Under "Programmer," select ArduinoISP, then click "Burn Bootloader."


Flashing the External-Clock Bootloader
The external-clock variant needs more parts, but the process is simpler.
- Upload the ArduinoISP example sketch to the UNO as above.
- Disconnect USB, then wire up the circuit as shown below.
Capacitors are 22 pF; the resistor is 10 kΩ.
Older instructions mentioned putting a 10 µF electrolytic capacitor between the UNO's RESET and GND — that note has since been removed from the documentation, and I found it worked fine without, so you can skip it.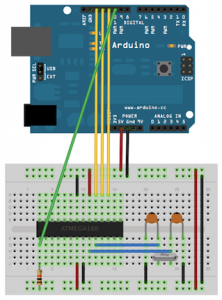
- Reconnect USB and select the board in the IDE — Arduino Duemilanove or Arduino Nano should work.
- Under "Programmer," select ArduinoISP, then click "Burn Bootloader."


That's the bootloader flashed. The official site also describes how to upload sketches via the Arduino UNO itself, but you can ignore that for now.
In the next part we'll add the FTDI serial connection circuit so you can upload sketches directly without needing the UNO.
No comments:
Post a Comment