- Wii Remote + Arduino + LEGO RC Car (Part 1): Parts Selection
- Wii Remote + Arduino + LEGO RC Car (Part 2): Driving DC Motors
- Wii Remote + Arduino + LEGO RC Car (Part 3): Bluetooth Dongle via USB Host Shield
- [Finished!] Wii Remote + Arduino + LEGO RC Car (Part 4): Controlling DC Motors with the Wii Remote
Last time we got a DC motor spinning with Arduino — but we're setting that aside for now.
This time we'll enable USB on the Arduino, connect a Bluetooth dongle, and get it talking to the Wii Remote.
It sounds complicated, but it's actually straightforward. That's what makes Arduino great.
USB Host Shield
Check on Amazon
If you get the Circuits@Home USB Host Shield, just stack it on top of the Arduino UNO's pin headers — that's all.
Circuits@Home-compatible shields are also available on Amazon.
Circuits@Home-compatible shields are also available on Amazon.
Check on Amazon
The SparkFun shield is easier to find in stores (and available from Switch Science).
However, the USB Host Shield library we'll be using is from Circuits@Home, and SparkFun's shield isn't compatible with it out of the box.
So we need to mod the SparkFun USB Host Shield.
The ADK Study Group site has an incredibly detailed walkthrough — follow along with that.
However, the USB Host Shield library we'll be using is from Circuits@Home, and SparkFun's shield isn't compatible with it out of the box.
So we need to mod the SparkFun USB Host Shield.
The ADK Study Group site has an incredibly detailed walkthrough — follow along with that.
- STEP 1: Cut the Vin trace
Scrape through the trace running from Vin. It takes some force — a small flat-head screwdriver works.

- STEP 2: Cut the traces from pins 7 and 8
Scrape through the traces running from pins 7 and 8. These are tricky — some run around to the back of the board, so look carefully.
From the front, they exit between pins 2–3 and between pins 7–8.
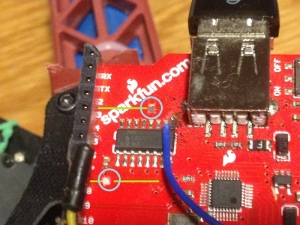
Completely unrelated, but that thing in the background is a quadcopter, not the RC car. - STEP 3: Bypass the 5V regulator
Bridge the middle pin of the regulator to the 5V pin with a wire.
If the pin headers are already soldered in, connecting to 5V from the top is awkward.
It's easier to run a wire from the regulator to the prototyping area on the board, then connect to the 5V pin from the back.
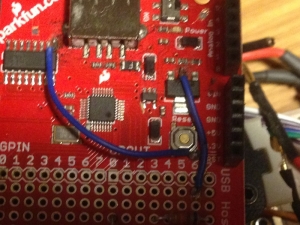
- STEP 4: Connect 74HC4050 to RST
Run a wire from the chip leg closest to the USB connector.
Linger too long with the iron and you'll kill the chip; rush and you'll bridge adjacent legs. Take it slow and steady.
Technically you solder to the RST pin, but soldering from the top is fiddly.
The easiest approach is to solder to the leg of the reset switch that's closest to the RST pin.
Honestly, surface-mount hand-soldering without a PCB clamp is a minor ordeal.


USB Host Shield Library
We're using Circuits@Home's USB Host Library 2.0.
Download the source from GitHub.
After downloading the ZIP, drop it into the
Arduino\libraries folder in your Documents directory and restart the Arduino IDE.Go to File → Examples → USB_Host_Shield_20 → Bluetooth — if "Wii" appears in the list, you're all set.
That's literally all it takes to be ready to communicate with the Wii Remote.
Arduino is incredible.
Source Code
For this step we're just verifying the Wii Remote connection, so we'll use the sample sketch from the USB Host Library.
Stack the USB Host Shield on the Arduino UNO, then plug the Bluetooth dongle into the USB Host Shield's USB port.
Open File → Examples → USB_Host_Shield_20 → Bluetooth → Wii in the Arduino IDE.
Upload the sketch to the Arduino UNO, then open Tools → Serial Monitor.
Connecting the Wii Remote
While the Arduino UNO is running, press buttons 1 and 2 on the Wii Remote simultaneously.
After a moment, the Bluetooth dongle's LED will flash and the connection will be established.
Press any button on the Wii Remote and the input will show up in the Serial Monitor.
No Bluetooth protocol knowledge required. No reverse-engineering the Wii Remote's communication format. Nothing like that.
That's all it takes to read Wii Remote input.
You can also read accelerometer values and Nunchuk inputs — browse the USB Host Library source to experiment.
Don't worry: after pairing with Arduino, the Wii Remote still works normally with your Wii when you power it on again.
Aside: Wii MotionPlus
Check on Amazon
Bit of a tangent, but you can pop the Wii MotionPlus (the heel attachment on the remote) off and wire it directly to Arduino to use it as a gyroscope sensor.
One Wii Remote opens up a surprising number of Arduino projects.
Taking it further: someone disassembled a Wii MotionPlus, extracted the accelerometer, and embedded it into an Arduino board to build a multicopter flight controller.
That project became MultiWii — an Arduino-based flight controller.
The quadcopter you spotted in the background earlier runs MultiWii, and has an extra Arduino attached so it can be flown with a Wii Remote.
I'll write that up separately sometime.
This time we enabled USB host functionality on Arduino and connected a Wii Remote over Bluetooth.
Next time we'll combine this with the DC motor control from Part 2 to finish the RC car.
No comments:
Post a Comment